Little Giant Incubator Instruction Manual: A Comprehensive Guide
Welcome! This manual provides detailed guidance for operating your Little Giant incubator, ensuring successful hatching. It covers setup, temperature, humidity, and troubleshooting.
Little Giant incubators, while reliable, often benefit from supplemental thermometers for accurate monitoring and daily egg rotation within the turner for optimal results.
The updated digital models offer convenient controls, but understanding consistent heat maintenance is crucial for maximizing hatch rates with this 41-egg capacity incubator.
Understanding Your Little Giant Incubator
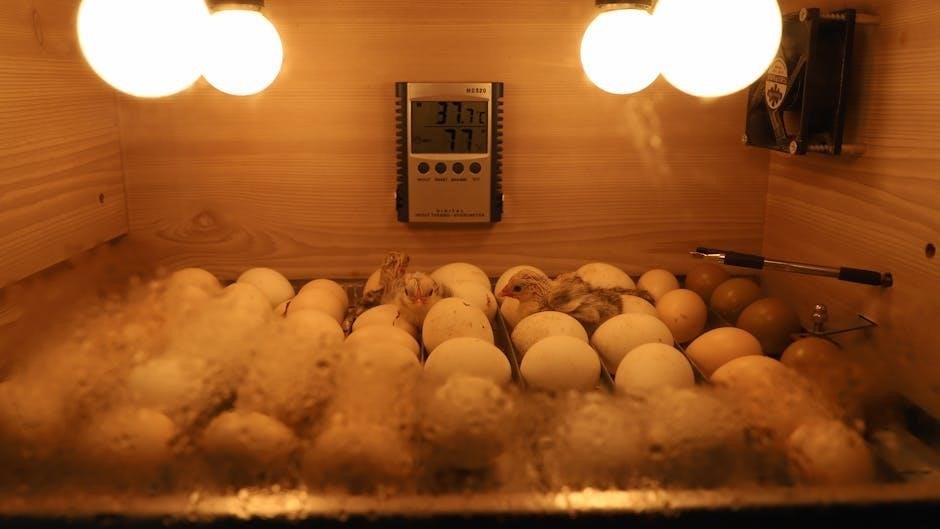
Your Little Giant incubator, a popular choice for hatcheries, utilizes Styrofoam construction for excellent insulation and a gentle heating element. These incubators come in still-air and circulated-air varieties, impacting temperature consistency.
The digital control board allows precise temperature settings, but users report needing supplemental thermometers to identify hot and cold spots. The 41-egg capacity offers ample space, though some prefer the less crowded hatch of other models.
Success relies on diligent monitoring and, sometimes, manual adjustments beyond the “set it and forget it” expectation.
Key Features of the 41-Egg Capacity Model
The 41-egg capacity Little Giant incubator boasts a spacious interior, accommodating up to 41 large chicken eggs. It includes an automatic egg turner, eliminating manual rotation, and comes equipped with quail rails for versatile hatching.
A digital control board provides precise temperature regulation, while the Styrofoam construction ensures consistent warmth. This 2025 updated model features a fan for circulated air, improving temperature distribution throughout the incubator.
It’s a tried-and-true design with modern digital enhancements.
Initial Setup and Preparation
Before first use, carefully unpack your Little Giant incubator and verify all components are present. Choose a stable, level surface away from direct sunlight and drafts for placement. Ensure access to a reliable power source.
Familiarize yourself with the digital control board and its functions. It’s recommended to run the incubator for 24 hours to stabilize temperature before adding eggs, allowing for calibration if needed.
Proper preparation is key to successful hatching.
Unboxing and Component Check
Upon receiving your Little Giant incubator, carefully open the packaging and inspect for any shipping damage. Verify the presence of all listed components: the incubator base, egg turner parts (if included), power cord, and this instruction manual.
Confirm the quail rails and automatic egg turner kit are present if your model includes them. A thorough component check ensures you have everything needed for a smooth setup and operation.
Placement and Power Source
Select a stable, level surface away from direct sunlight, drafts, and high-traffic areas. Ensure adequate ventilation around the incubator. Connect the provided power cord to a grounded electrical outlet, verifying the voltage matches the incubator’s requirements.
Avoid extension cords if possible; if necessary, use a heavy-duty cord. Proper placement and a reliable power source are vital for maintaining consistent temperature and humidity.
Temperature Control and Calibration
The digital control board allows precise temperature setting, crucial for successful hatching. Initial calibration is recommended using a reliable thermometer placed inside the incubator, away from the heating element. Monitor for hot and cold spots, as Little Giants can have temperature variations.
Adjust settings accordingly to maintain the recommended temperature for your specific egg type. Consistent monitoring and adjustments are key.
Digital Control Board Overview
The digital control board features intuitive buttons for setting the desired temperature. A display shows current temperature readings, though independent verification is advised due to potential inaccuracies. Use the up and down arrows to adjust settings, and the ‘set’ button to confirm.
Familiarize yourself with the board’s functions before starting incubation; Consistent monitoring is vital, as readings may not always reflect the entire incubator’s environment.
Addressing Temperature Inconsistencies

Temperature fluctuations are common in Little Giant incubators. Utilize multiple thermometers placed throughout the unit to identify hot and cold spots. Rotate eggs daily within the turner to mitigate these variations, ensuring even exposure.
Adjust incubator placement, avoiding drafts or direct sunlight. If inconsistencies persist, consider a supplemental heat source or improved insulation to maintain stability.
Humidity Management

Maintaining proper humidity is vital for successful hatching. Regularly check and refill the water trays, adjusting water levels based on incubator conditions and egg type. Monitor humidity levels closely, as fluctuations can impact hatch rates.
Consistent humidity prevents excessive moisture loss or membrane sticking. The Little Giant’s design requires diligent monitoring to ensure optimal conditions throughout the incubation period.
Water Tray Maintenance
Regularly inspect the water trays within your Little Giant incubator. Ensure they are clean to prevent bacterial growth, which can harm developing embryos. Refill trays with distilled water as needed, maintaining consistent humidity levels.
Avoid overfilling, which can lead to excessive moisture. Monitor water consumption; increased usage indicates higher ventilation or lower humidity. Clean trays post-hatch to prepare for future use.
Monitoring Humidity Levels
Accurate humidity is vital for successful hatching. Use a reliable hygrometer to track levels within your Little Giant incubator. Generally, maintain 50-65% humidity during incubation, increasing to 65-75% during lockdown.
Adjust humidity by adding or removing water from the trays. Consistent monitoring, especially with digital models, helps avoid fluctuations impacting hatch rates. Observe water consumption for insights.
Egg Turning System
The automatic egg turner simplifies incubation, rotating eggs at regular intervals. Ensure the turner operates smoothly and all eggs make full rotations. For optimal results, supplement with daily manual rotation, redistributing eggs within the turner.
This ensures even temperature exposure, addressing potential hot or cold spots within the incubator. Consistent turning is crucial for preventing embryos from sticking to the shell membrane.
Automatic Egg Turner Operation
The Little Giant’s automatic turner effortlessly rotates eggs, eliminating manual handling. Confirm the motor functions correctly, initiating movement as expected. Observe a full rotation cycle to ensure all eggs are adequately turned.
While convenient, don’t solely rely on automation; supplemental manual rotation is recommended for improved results. This addresses potential uneven turning and ensures consistent embryo development.
Manual Egg Turning (If Applicable) & Daily Rotation
For models without automatic turning, or as a supplement to the automatic system, manual rotation is vital. Gently turn each egg 180 degrees, marking one side with an ‘X’ to track completion.
Perform this rotation at least three times daily, ensuring even exposure to warmth. Consistent daily rotation, even with an automatic turner, improves hatch rates by preventing sticking and promoting development.
Egg Candling and Observation
Candling allows you to monitor egg development without opening the incubator. Use a bright flashlight in a darkened room, shining through the eggshell.
Look for visible veins indicating fertility, typically appearing around day 7. Infertile eggs will appear clear. Continue candling periodically to remove any eggs that have stopped developing, maintaining incubator hygiene.
Candling Techniques
Effective candling requires a dark environment and a focused light source. A bright LED flashlight works well. Gently roll the egg across the candling surface, observing for vascular development.
Hold the light firmly against the shell, avoiding excessive pressure. Candling is best performed after day 7 of incubation. Consistent candling helps identify and remove infertile eggs promptly.
Identifying Fertile Eggs
Fertile eggs exhibit visible vascular development – a network of red veins radiating from the yolk. This becomes apparent around day 7-10 of incubation. A clear egg, or one with a simple ring, is likely infertile and should be removed.
Observe for consistent growth of the vascular pattern. Darkening or lack of development indicates a non-viable embryo. Careful observation maximizes hatch success.
Hatching Process
Around day 18, initiate “lockdown” – cease egg turning. Maintain consistent temperature and slightly increase humidity to aid pipping and hatching. Resist opening the incubator during this critical phase.
Allow chicks to hatch undisturbed. The crowded hatch area of some models requires patience. Once dry and fluffy, chicks can be removed. Proper lockdown ensures optimal hatching conditions.
Lockdown Procedure
Three days before the expected hatch date, begin lockdown. Stop the automatic egg turner and remove the quail rails. Increase humidity by adding water to the trays, but avoid wetting the eggs directly.
Crucially, do not open the incubator unless absolutely necessary, as this disrupts the humidity and temperature. Maintaining stable conditions is paramount for successful pipping and hatching.

Maintaining Optimal Conditions During Hatching

Resist the urge to assist chicks! Allow them to hatch independently; intervention can be harmful. Maintain consistent temperature and high humidity levels throughout the hatching period.
Monitor closely, but minimize opening the incubator. A slightly crowded hatch area is preferable to fluctuating conditions. Ensure adequate ventilation after the majority have hatched.
Troubleshooting Common Issues
Temperature fluctuations are common; use supplemental thermometers to pinpoint hot/cold spots within the incubator. Humidity problems often stem from inconsistent water levels – monitor frequently.
If hatching rates are low, review temperature logs and humidity readings. Remember, Little Giant incubators aren’t “set it and forget it,” requiring diligent observation and adjustment.
Temperature Fluctuations
Temperature inconsistencies are frequently reported with Little Giant incubators. Utilize multiple thermometers placed throughout the chamber to identify warmer and cooler zones.
Avoid placing the incubator in drafty areas or direct sunlight. Regularly check the digital control board’s calibration and adjust as needed. Daily monitoring is vital for stable incubation.
Humidity Problems
Maintaining correct humidity is crucial. Ensure the water tray is consistently filled, but avoid overfilling to prevent excessive moisture. Monitor humidity levels closely, as fluctuations can impact hatch rates.
If humidity is too low, add more water; if too high, briefly open the incubator. Remember, proper ventilation and water management are key to a successful hatch with this model.
Cleaning and Maintenance

Post-hatch cleaning is essential to prevent bacterial growth. Thoroughly disinfect all components with a mild solution after each hatch, ensuring everything is completely dry before storage.
For long-term storage, clean and dry the incubator meticulously. Store in a cool, dry place. Regular maintenance extends the incubator’s lifespan and ensures optimal performance for future hatches.
Post-Hatch Cleaning
Immediately after chicks hatch, remove all debris and unhatched eggs. Disinfect the entire incubator interior, including the water trays and egg turner, with a mild disinfectant solution.
Pay close attention to corners and crevices where bacteria can accumulate. Rinse thoroughly with clean water and ensure complete dryness before reassembling. This prevents contamination for future hatches.
Long-Term Storage
Before storing your Little Giant incubator for an extended period, thoroughly clean and dry all components as outlined in the post-hatch cleaning instructions. This prevents mold and mildew growth.
Store the incubator in a dry, dust-free environment, protected from extreme temperatures. Loosely cover it to shield from dust. Inspect for any damage before future use, ensuring optimal performance.
Comparing Little Giant Models
Little Giant offers both still-air and circulated-air incubators. Still-air models, like the classic 41-egg, rely on natural convection, requiring more diligent temperature monitoring. Circulated-air models utilize a fan for even heat distribution.
Capacity is another key difference; while the 41-egg incubator is popular, Little Giant provides smaller and larger options to suit varying hatching needs. Consider egg volume and space constraints when selecting a model.
Still-Air vs. Circulated Air Incubators
Still-air incubators, like many Little Giant models, depend on natural convection, creating temperature gradients. Consistent monitoring with multiple thermometers is vital. Circulated-air incubators employ a fan, distributing heat evenly and minimizing temperature fluctuations.
While circulated-air models offer greater stability, still-air incubators can be effective with careful management. The 41-egg model is a classic still-air option, requiring diligent attention to detail.
Capacity Considerations (41-Egg vs. Other Sizes)
The 41-egg capacity Little Giant incubator offers a balance between volume and manageability. Larger incubators, like the King uRoMax20, may hold fewer eggs but provide more consistent conditions. Smaller models simplify monitoring but limit hatch potential.
Consider your flock size and hatching frequency when choosing. The 41-egg model’s spacious hatch area avoids overcrowding, a benefit noted by experienced users.
Advanced Techniques for Improved Hatch Rates
To maximize success, supplement the digital controls with additional thermometers placed strategically within the incubator. This identifies hot and cold spots, allowing for egg rotation to ensure even temperature exposure.
Optimizing egg placement—avoiding direct airflow—and diligent monitoring of temperature fluctuations are key. Experienced users report improved results with these proactive adjustments.
Using Additional Thermometers
Employing multiple thermometers is highly recommended due to potential inconsistencies within the Little Giant incubator. Place them at various points – near eggs, fan, and heating element – to map temperature variations.
Regularly compare readings to the digital display, identifying areas exceeding or falling below the ideal range. This data informs egg rotation strategies, ensuring uniform warmth for optimal development and hatch rates.
Optimizing Egg Placement
Strategic egg arrangement within the incubator is vital. Rotate eggs within the automatic turner daily, even with the automated system, to counteract potential hot or cold spots identified using additional thermometers.
Avoid overcrowding; ensure adequate airflow around each egg. Consider slightly tilting eggs for improved air sac development. Consistent repositioning promotes even heating and maximizes the chances of successful hatching.
Resources and Support
Need assistance? For direct support, contact Little Giant – details are available through their official channels. Online forums and dedicated communities offer valuable insights from experienced users, sharing tips and troubleshooting advice.
These platforms are excellent for addressing specific issues and learning advanced techniques. Explore these resources to enhance your incubation process and maximize hatch rates with your Little Giant incubator.
Little Giant Contact Information
For direct assistance with your Little Giant incubator, reaching out to their support team is recommended. While specific contact details weren’t explicitly provided in the source texts, a search online for “Little Giant Incubators Contact” will yield the most current information.
Expect to find phone numbers, email addresses, and potentially a contact form on their official website. This ensures you receive accurate and tailored support for your specific model.
Online Forums and Communities
Expand your knowledge and connect with fellow Little Giant incubator users through online forums and communities! These platforms offer invaluable shared experiences, troubleshooting tips, and advanced techniques.
Search online for “poultry incubator forums” or “backyard chicken forums” to discover active discussions. Users frequently share insights regarding temperature calibration and maximizing hatch rates with Little Giant models.